For years, the Starlink Gen 2 (Actuated) was the gold standard for nomadic internet. It was reliable, portable, and worked from Alaska to the tip of Florida. However, with the release of the Starlink Gen 3 Standard Dish, the conversation has shifted from portability to permanent integration.
If you’re tired of setting up a tripod every time you park, a permanent roof mount is the move. Here is everything you need to know about the upgrade, the install, and the performance gains.
Gen 2 vs. Gen 3: Why Upgrade Now?
The Starlink Gen 3 isn’t just a “newer version”; it’s a design overhaul.
Wi-Fi 6 Support: Unlike the Gen 2, the Gen 3 router supports Wi-Fi 6, offering better range and handling more devices simultaneously—essential if you have a “smart” rig.
No Motors, Fewer Failures: By removing the internal motors, Starlink has made the Gen 3 more robust for roof mounting.
Field of View: The Starlink Gen 3 has a slightly broader field of view, allowing it to stay locked onto satellites more efficiently while the RV is in motion.
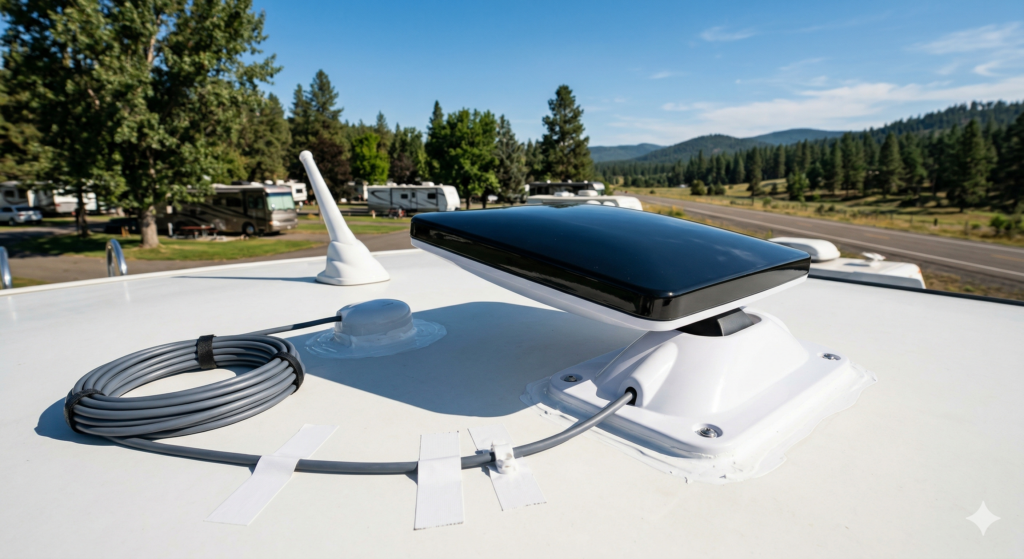
The Installation: Going Permanent
To achieve a “Native” look for your rig, avoiding loose cables is key. We utilized the Starlink Official Roof Mount, which offers a much cleaner aerodynamic profile than the standard kickstand.
1. Routing the Cable
The biggest hurdle for any RVer is the “roof-to-interior” transition. If your rig has a pre-existing satellite or solar junction box, use it.
Pro Tip: Use the existing coax or satellite wires as “pull lines.” Tape your Starlink cable to the old wire and pull it through to your media cabinet.
Sealant is Non-Negotiable: Use self-leveling Dicor on every screw head and around the entry point. For the cable itself, a strip of Eternabond tape will prevent wind-humming at highway speeds.
2. The Power Setup
The Gen 3 router and power supply are separate units. For a clean look, mount them inside a cabinet near your 120V outlet. If you have a TV lockout (a device that kills the TV power while the engine is running), you can often bypass this to use that dedicated circuit for your router instead.
The “Billing Trap” (Avoid This)
One detail native users often overlook is Starlink’s rigid billing. Starlink does not pro-rate. If you activate a new Starlink Gen 3 account while your Gen 2 is still active, you’ll be paying for two full subscriptions that month.
Editorial Note: Time your activation for the final 48 hours of your current billing cycle to avoid a double charge.
Performance: Real-World Speed Tests
Scenario
Download Speed
Upload Speed
Clear Sky (Gen 2)
203 Mbps
25 Mbps
Clear Sky (Gen 3)
280+ Mbps
30 Mbps
In-Motion (65 MPH)
135 Mbps
15 Mbps
Congested Campground
373 Mbps
18 Mbps
While the Gen 2 is still a powerhouse, the Gen 3 consistently reached higher peaks (370+ Mbps) in modern “Roaming” zones. The Wi-Fi 6 router also significantly improved speeds at the far end of the campsite (outside the rig).
Is it worth the $350 ($199 on sale)? If you value a 5-minute setup time and want “always-on” internet while driving, the answer is a resounding yes. The Gen 3 is built for the permanent RV lifestyle in a way the Gen 2 never quite was.
One of the most annoying things at the airport is waiting by the baggage carousel while your suitcase never shows up. After a long wait, you have to go to the lost baggage desk, fill out forms, and get a vague “we’ll contact you” reply. It’s a common travel headache.Google...
Even though years have passed since the introduction of Windows 11 into our lives, users’ love for Windows 7 still persists. In this article, we will share a simple method for those who want to give their Windows 11 operating system the appearance of Windows 7. Here’s what you need...
In the age of digital video, videos have become an essential part of our lives. We watch videos from social media posts to presentations and demonstrations at work. Whether you’re a professional content creator or just a beginner on the way to mastering video editing, having at your disposal a wide...
Google is generally known for its search functionality and productivity applications like Google Docs or Google Sheets. However, those active on Twitter have likely seen the popular emoji-mixing bots that combine multiple emojis into a single one. The Google Emoji Kitchen feature allows users to create fun and unique stickers...
Sometimes TikTok turns into a Wild West with debates, strange trends, and unruly comment sections. And there are times when you need to set a boundary for your peace. Fortunately, blocking someone on TikTok is extremely easy. Here’s what you need to do for block someone on TikTok: Step 1:...
With the widespread use of social media platforms, millions of people have shared countless pieces of content over the years. Since Facebook opened to the public in 2006, platforms like X (formerly Twitter) and Instagram have also become significant parts of users’ digital history. However, old social media posts accumulated...